Increased warehouse efficiency for small order operations via system-directed cluster picking

Cluster picking in Dynamics 365 for Finance and Operations aids to more efficiencies for small order picking operations. System-directed cluster picking guides a user in a way that items for multiple sales orders are picked at the same time by grouping such into pick clusters. Short, a pick location needs to be visited only once for multiple sales orders. By leveraging system-directed picking and configuring cluster profiles, Dynamics 365 for Finance and Operations groups clusters by the number of positions (# of sales orders in a cluster) without having to manually create a cluster. The cluster profile also determines when a cluster is broken such as when put work is completed or work is closed. Additionally, verification types (None, position scan or license plate scan) can also be added to increase control and quality for picking operations. Lastly, system-directed work sequence queries can group sales orders and assignment of work even based on company-specific criteria and custom sorting criteria.
Note: The actual picking process for system-directed cluster picking on the AWM device is the same as the process for user-directed cluster picking – only difference is that the cluster is already created for system-directed cluster picking based on specified sorting criteria.
1. Prerequisites
Below, I am addressing necessary prerequisites for system-directed cluster picking via AWM mobile application.
1.1 Set up AWM application
Configure Azure App Registration
Initially, we will need to set up an Azure App registration via Azure portal ,(https://portal.azure.com/) what is required in order to connect and use our AWM warehousing application later on. This is necessary so that the Microsoft identity platform is able to provide authentication and authorization. The registration itself is establishing a trust relationship between the application and the identity provider later (here: Microsoft identity platform). When creating the Azure App registration, make sure you are in the correct tenant in the top menu. Under Azure Active Directory and Manage/App registrations/New Registration create the new Application registration. You are able to specify a specific application name while Azure AD assigns the unique client ID automatically. We specify “My organization only” as supported account types to indicate that this application is used only by users (or guests) in our tenant. As a last step we confirm with “Register”.

Afterwards, we will still need to create the client secret or certificate as required to connect the AWM warehousing application later on. The client secret is essentially a string value used for identification that the application can use instead of a certificate. Please note that client secrets are often preferred as of the ease of use – however such are considered the less secure option compared to certificate credentials. Here, we will simply use the client secret. Under Azure Portal/App registration/Select the above created application registration, please navigate to Certificates and secrets/New client secret to create a new secret. I am able to specify the secret name as well as the expiration (12, 24 or never). The maximum custom secret lifetime is 24 month – and the recommendation is to set it to 12 months in general. Confirm with “Add” and save the secret’s value to be referenced later in the AWM warehousing application. Please note that this secret value is never displayed again after you leave this page so please make sure to note down the value.

1.2 Configure App in D365FO
After creating the App registration in Azure portal, we will need to create an Azure Active Directory Application record in Dynamics 365 for Finance and Operations to establish trust and grant access to the specific instance of D365FO. Please bear in mind, this step is only required when using service authentication via secret key instead of user impersonation. Under System Administration/Setup/Azure Active Directory applications, I created a new record and referenced the clientID – means Azure ApplicationID – from above as well as added a name and a userID. The userID should be preferably a service account userID with full access. Here, we used an admin account but you can also create a separate WMAPP service account under System administration/Users/Users that can be assigned as warehousing mobile device userID.

1.3 Connect AWM application
As a next step, we will download the AWM warehousing application and configure the connection between application and D365FO.
Download the AWM application under:
– For windows: ,https://www.microsoft.com/en-us/p/dynamics-365-for-finance-and-operations-warehousing/9p1bffd5tstm?rtc=1#activetab=pivot:overviewtab
– For Android: ,https://play.google.com/store/apps/details?id=com.Microsoft.Dynamics365forOperationsWarehousing
Note: In order to use the latest version of the app, the operating systems installed on the devices need to be Windows 10 (Universal Windows Platform [UWP]) Fall creators update 1709 (build 10.0.16299) or later OR Android 4.4 or later.
Note: As addressed above in 1.1, we can authenticate by using either a client secret or a certificate. Generally speaking, when using a certificate, you will have the option to import connection setting files and/or QR codes for setting up your AWM devices. Here, the settings file would follow JavaScript Object Notation (JSON) format and syntax. This is not possible when going with client secret.
As we went with the client secret in 1.1, we will connect the AWM warehousing application to D365FO through Azure AD application as follows:
After opening the AWM warehousing application, we configure the connection on the AWM warehousing application under Connecting Settings. As a first step, we disable the “use demo mode” flag as well as select connection.

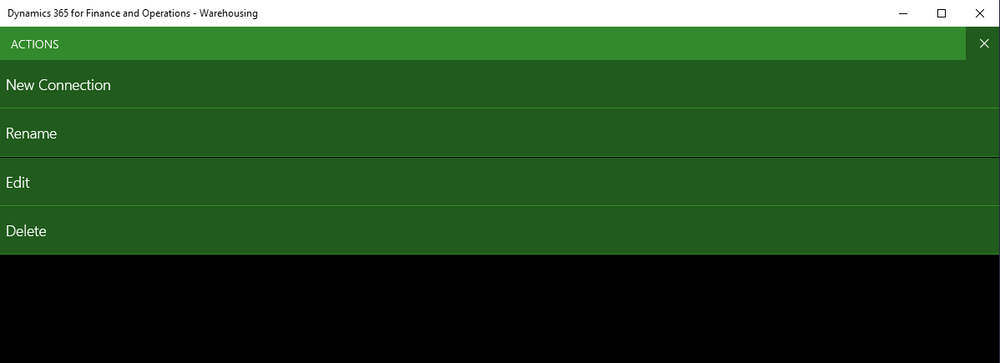
Following, we create a new connection under Actions/New connection.
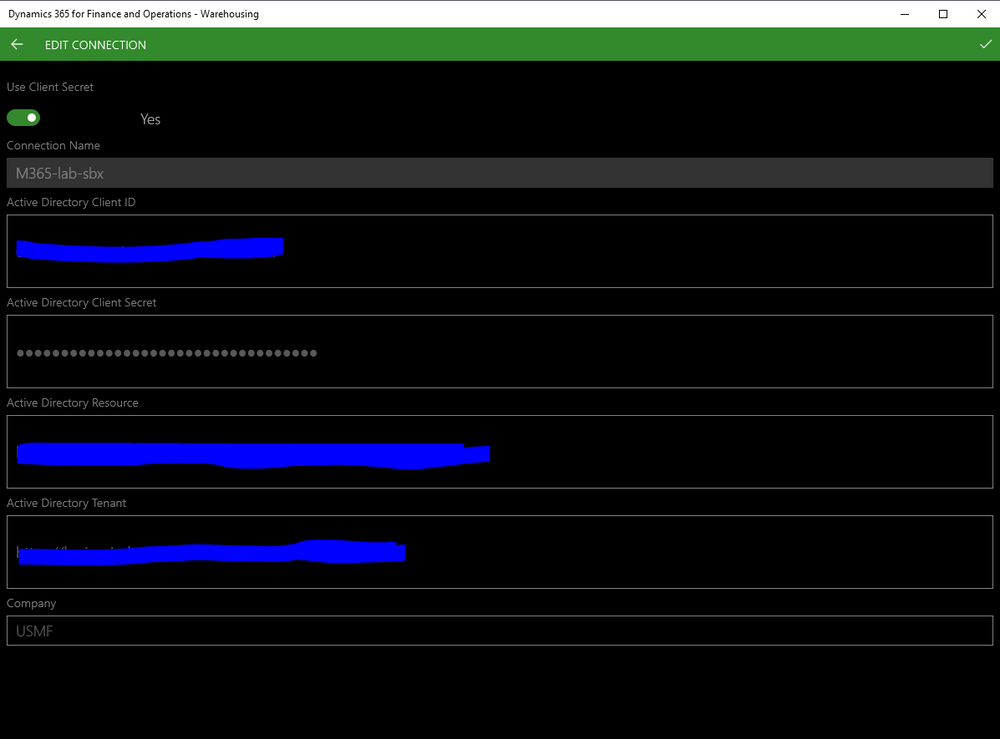
Lastly, we need populate the following 6 information to finalize and establish the connection.
Use client secret flag = Set to “Yes” in case you use a client secret to authenticate. If “No”, a certificate is used for authentication.
Name = Enter a connection name. The name itself must be unique for all connection strings stored at the same device (just in case you add multiple connections per device).
App/Client ID = Enter the client ID from 1.1
Client Secret = Enter the client secret that we noted down in 1.1
Active Directory Tenant = Enter your Azure AD tenant. (e.g. https://login.windows.net/)
Resource = Specify the root URL of your Dynamics 365 for Finance and Operations environment.
Company = Enter the Legal entity that you would like to connect to (E.g. USMF legal entity).
Confirm and the connection is established.
1.4 Set up HR/AWM worker as well as set up AWM mobile device password
In order to use the AWM warehousing application now, we still need to set up our worker record, tie it to our userID in D365FO and set up a AWM mobile device password.
First, we will set up the HR worker under Human Resources/Workers/Workers and by clicking “New” on the upper left hand corner. First and last name, employment start date are required fields – thus, such need to be specified. It is recommend to also add default legal entity as well as position association. However, for now, we neglect this as not needed for this scenario.

Following, we connect the created HR record to our userID under System administration/Users/Users. In the details view and in edit mode, we can populate our HR worker in the person field.

Now, we create our AWM worker record under Warehouse management/Setup/Worker. We assign our HR worker record in the worker field as well as specify our default site, warehouse and location if needed. In case we would use containerization, we would now also specify the container packing policy as well as packing profile ID. For now, we neglect those configurations as not needed for this scenario. As a next step, we add a new userID for our created work user (Here: UserID = “CS”) We assign a user name, default warehouse and menu name. (Here: “Main”) The assigned menu name will later determine which mobile device menu items you will have access to on the AWM application. As soon as you save the record for the first time, you are prompted to set the password. In case you will ever forget your password a user with sysadmin rights can easily reset your password. (see “Reset password” option in the screenshot below)

Lastly, we ensure that we have the correct access from a warehouse standpoint. As of the above, we can only access our default warehouse 24. Let’s say for the below demo however, we also need access to warehouse 62. To grant access, we leverage the “warehouses” option shown in the Users Tab in the screenshot above. Here, we add warehouse 62 as allowed warehouse (See screenshot below). Now, we are ready to log in to our AWM application with the work userID and the set password and do some magic.

2. Configurations for System-directed cluster picking
2.1 Enable SD cluster picking
Before we go into the final demo, we still need to configure system directed cluster picking. As a first step, we will need to enable the “System directed cluster picking” as well as the “Organization-wide system directed work sequencing” features under Feature Management.
Note: This is a point of no return and the feature cannot be turned off once it has been enabled.


2.2 Setting up the Cluster Profile ID
After enabling the features, we set up the cluster profile as follows:
- Cluster profile ID and name = Specify a unique cluster profile ID and a name.
- Generate cluster ID = This option controls whether the cluster ID will be generated by the system automatically or if the cluster ID will be entered by a user at the start of picking work processing. In this scenario, we select “Yes”.
- Activate positions = If flagged to “Yes”, this option generally controls if position names are automatically generated based on position name setup. If flagged to “No”, simply the license plate ID foe the position is used. In this scenario, we select “Yes”
- Number of positions = This field determines the number of orders that will be grouped into one cluster. In this scenario, we populate “2” – means creating clusters for every 2 sales orders.
- Position name = This option controls if the positions are named in either numeric or alphabetical order. In this scenario, we are are following numeric order.
- Break cluster = This option determines when the cluster will be broken down again – either when put or when work is completely closed. In this scenario, we are breaking the cluster when put.
- Sort verification type = This option determines if a position verification is required. (None, License plate scan, Position scan). In this scenario, we require a position scan what ensures that the put-to-position step is verified.
- Cluster sorting Fast Tab = This controls sorting criteria used for clusters.
- Sequence number = This field controls the sequence D365FO sorts by. (Here: “1”)
- Field name = This field controls the specific field D365FO is using for sorting criteria. (Here: “WMSLocationID”)
- Sorting = This field specifies if the sorting is following ascending or descending order. (Here: “Ascending”)

2.3 Setting up the mobile device menu item & menu
The next step is actually setting up a mobile device menu item for system-directed cluster picking as well as assigning the configured menu item to the main/outbound menu.
That said, we create a new mobile device menu item under Warehouse management/Setup/ Mobile device/Mobile device menu items.
We specify a name, a title, set the mode to “Work” and set the use existing work flag to “Yes”.
In the “directed by” dropdown, we will see now the system directed cluster picking option as we enabled that feature earlier. You would not see that option if the feature wouldn’t have been enabled. We set the generate license plate flag to “Yes”. Lastly, we reference the prior created cluster profile ID.
In the work classes tab, we reference work class ID “Sales” as valid work class for this mobile device menu item.

On the Actionpane, we can now select system directed work sequence queries to create a new query. You can add multiple queries and sequence them accordingly here if required. For this example, we simply create one record with sequence “1” and system directed query description “Priority 1”.

As a last step for the mobile device menu item, we select now “edit query” on the Actionpane and specify our criteria in the sorting tab. In this example, we added to lines – one for work priority and one for work ID. Both are following ascending search direction. The system will now sort work IDs in the cluster, first by work priority and then by work ID.

We completed the configuration of the mobile device menu item. However, we still need to assign the mobile device menu item to a menu (Here: “Main/Outbound”). That said, under Warehouse management/Setup/Mobile device/Mobile device menu we add the “SD Cluster” menu item to the outbound menu. The Outbound menu is already assigned to the main menu – so no action to take here.

2.4 Wave template, Work template & Location directive
As a last step, we simply want to validate that wave template, work template and location directive are set up correctly for outbound operations (wave type “shipping” and work order type “sales orders) in USMF and specifically for warehouse 62 as leveraged for the demo below.
a) Wave template
The wave template determines how waves are processed (manual vs. automatic) and how the work is generated when the wave is processed. You can set up one or multiple wave templates per wave template type (for shipping, production orders, or kanbans) and sequence them accordingly. The query on the Actionpane can be leveraged to specify matching criteria under what circumstances and conditions a specific wave template is being used. Additionally, methods for containerization and replenishment can be added in addition to the validateWave, createLoads, allocateWave and createWork default methods that are required. For now, we neglect containerization and replenishment as not required for system-directed cluster picking.
The below wave template is configured for site 6 and warehouse 62 specifically. As you can see below, I flagged the “Automate wave creation” flag to “Yes” to automatically create waves when a sales order is released to the warehouse. I also flagged the “Process wave at release to warehouse” flag to “Yes” to automatically process the wave and create work when a line is released to the warehouse. Lastly, I flagged the “Automate wave release” flag to “Yes” to automatically release the wave. That means picking work is created and made available on the AWM device automatically. After I completed my setups, I validated the wave template via “Validate template” button on the Actionpane.

b) Work template
Work templates direct work operations. Work operations in D365FO always consist of a pick and a put action. You can create one or many work template per work order type (for Purchase orders, Sales orders, Raw material picking, Finished goods put away, Co-product and by-product put away, Transfer issue….) and sequence them accordingly. The query on the Actionpane can be leveraged to specify matching criteria under what circumstances and conditions a specific work template is being used. On the header and under General, you can add conditions on when new work should be created such as maximum number of pick lines and/or a maximum expected pick time. For now, we neglect that as not needed for this use case.
On the work template lines, we specified a pick and a put work type action. Both are set to mandatory as well as the directive code “Pack” is assigned to the put action. A directive code is linked to a location directive and work template, and therefore helps ensure that the warehouse work is processed in the correct location in the warehouse. Here, this will insure that the items are put to the pack location – more details on it below under location directives.

Looking closer at the query on the Actionpane, we can see that matching criteria are specified under what circumstances and conditions this specific work template is being used. Here, it says simply that we use this work template for temporary work transactions applicable to warehouse 62.

c) Location directive
Lastly, location directives are used for identifying pick and put locations. (e.g. where to receive a certain item or where to pick a certain item from) We will need at least 2 location directive records of work order type “Sales orders” – one of work type pick and one of work type put. You can create one pick and put or many pick and put work type location directives per work order type (for Purchase orders, Sales orders, Raw material picking, Finished goods put away, Co-product and by-product put away, Transfer issue….) and sequence them accordingly via sequence field.

Pick work type:
On the location directives header, we specify besides the work order type (Purchase order, Sales order, Raw material picking, Finished goods put away,…), the work type (Pick or Put) also the applicable site and warehouse as well as a directive code if applicable. In our case, we do not have such for the pick work type.
On the location directive lines, we can specify additional restrictions on how to find the location such as restrict by unit, round up to unit, etc. For now, we neglect this and only allow splitting.
On the Location Directive Actions, we can define in which sequence, which locations and under what circumstances locations should be chosen. In our case for example, we first try to pick from the “Floor” location and only when there is no onhand inventory available we will pick from all other locations within the warehouse. This is set up via the location directive actions and its queries – See below. In our case, we do not restrict the pick work type location directive to just fixed locations – we allow fixed and non-fixed location.
First, we pick from floor location:

Then, we pick from all other locations in the warehouse:

On the Actionpane and via query, we specify when a particular location directive is used (if not already tied to work template via directive code). In our case, we only have one pick work type location directive so we leave that query wide open.
Put work type:
Similarly than on the pick work type, on the location directives header, we specify besides the put work type also the applicable site and warehouse as well as a directive code if applicable. For our example, as prior mentioned in the work template section, we specified the “pack” directive code on the put work type for out work template. To close the loop, we reference the pack directive code here in our put work type location directive header.

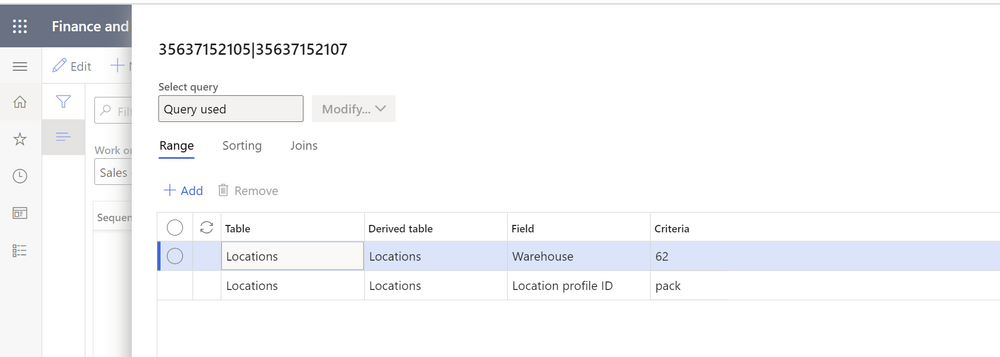
In the location directive actions query, we specify that the put location has to be in warehouse 62 and to a location that has the location profile ID “pack” assigned.
As the put location for our example will be a location with location profile ID “pack” assigned, let’s take a look and identify the specific location under Warehouse Management/Locations. Filtering our warehouse locations by location profile ID “Pack”, you can see the warehouse location that will be selected for our put operations.

Short and to sum it up, we would expect the sales order for warehouse 62 to be waved automatically. The work will also be created automatically with release to warehouse, we will pick first from the floor location prior picking from all other locations in the warehouse and the put location will be “Pack” in warehouse 62.
3. Demo – End to end process:
Initially we need to create multiple sales orders for our picking work and so that D365FO can group those sales orders into cluster. For this demo, we require 2 sales orders as we set up two cluster positions in the cluster profile above.
Create and confirm sales order #1 for Customer US-004, warehouse 62, and item A0001 (Q=1) and A0002 (Q=2).

Reserve inventory for both lines in the above sales order under sales order lines/inventory/reservation and reserve lot button.


Create and confirm sales order # 2 for Customer US-005, warehouse 62, and item A0001 (Q=3) and A0002 (Q=4).

Reserve inventory for both lines in the above sales order under sales order lines/inventory/reservation and reserve lot button.


Release both sales order to warehouse by marking both in the All Sales Orders form and by leveraging the release to warehouse control on the Actionpane.

When the release to warehouse process is completed, an informational message will be displayed.
Shipments will be created for each sales order. Wave is processed automatically as of wave template set up. See the successful wave processing below:

Work has been created – see under All Sales order form and Sales order lines/warehouse/work details – e.g. for Sales order #1 from above.

Log in into AWM device with prior set up credentials (Work userID and password).

Under Main menu/Outbound/SD Cluster menu item, initiate the cluster pick: (Note: Make sure you are in the correct warehouse within the AWM application – if not, change warehouse to warehouse 62 via “Change warehouse” menu item.)
In the backoffice application and under work clusters, see that our cluster is automatically created and the two work IDs that we created earlier are attached. If you created more than two sales orders, only the first two are added to the cluster. Notice that the work IDs are added to the cluster in ascending order as specified in the query setup.

The new cluster is automatically created only if enough additional work IDs were previously created. (enough sales orders were released/waved) Otherwise, the following message is shown:
“Not enough work can be found for cluster.”
After you select the menu in the AWM warehousing application, the first pick screen appears. The system aggregates all matching pick lines from the two work IDs and directs you to visit the pick location one time, so that you can satisfy both orders by using one pick.

Confirm picking location and pick with “OK”. Enter the position name (Here: Numeric) to confirm -Here,1 for A0001 and 2 for A0002. Repeat this process until all item quantities have been picked from the correct position.
E.g. see pick for item # A0002 and consolidated/clustered item quantity.

The last step on the mobile device is to Put the cluster in the final location. When the put operation is confirmed, the cluster is closed and now broken since we specified to break the cluster on put in cluster profile.

See confirmation message that the cluster is completed.

See in the backoffice application now that the pick work and put work to the pack location has been completed. The work is closed.

Christian Segurado
Senior Consultant, Mazars Microsoft Practice
Christian.Segurado@mazarsusa.com

Responses